
The Playground replaces the standalone Chat and App Builder tabs.
Everything those tabs did is here, plus multi-host compare and a dockable
Sessions rail.
Key Features
- Chat with frontier models — Talk to your server using Claude, GPT, Gemini, DeepSeek, and more at no cost, no API key required. Organizations can configure additional model providers in their organization settings.
- Manual tool invocation — Run any tool from the Tools rail with your own inputs to iterate on a widget or response without prompting a model.
- Widget emulator — Render widgets exposed via
openai/outputTemplate(ChatGPT Apps) orui.resourceUri(MCP Apps) the same way a real host would, with Inline, Picture-in-Picture, and Fullscreen display modes. - Chat / Trace / Raw views — Switch between the conversation, a timestamped timeline of every step (with per-step latency and tokens), and the exact JSON payload sent to the model.
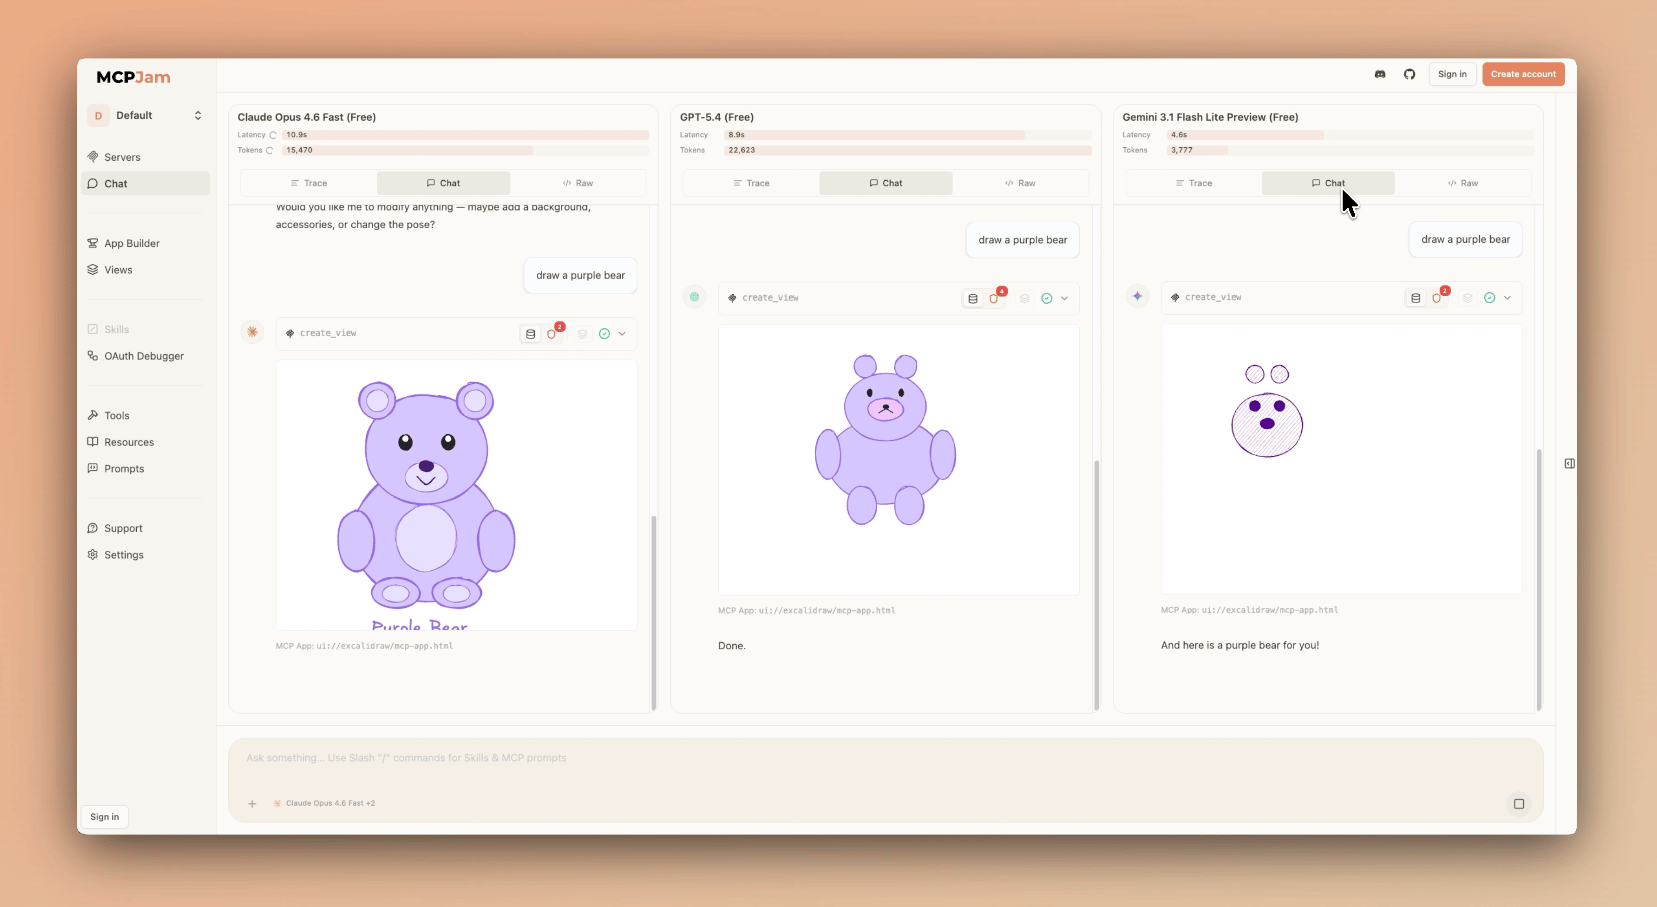
- Multi-model compare — Send a single prompt to up to 3 models at once and watch the responses side by side.
- Multi-host compare — Render the same tool call under multiple host configurations (ChatGPT vs Claude, different device sizes, different capability sets) at the same time.
- Display context controls — Device viewport, light/dark theme, host style, locale, timezone, CSP mode, device capabilities, and safe area insets — all live in the toolbar.
- Per-widget debugging — Inspect raw tool input/output,
widgetState, model context, and CSP violations from icons above each widget. - JSON-RPC logger — Real-time, filterable feed of every message between the inspector and your servers.
- Sessions rail — Resume, archive, and search past conversations from the left rail.
- Skills and prompts — Type
/to inject skills or MCP prompts directly into the chat. - Edit tool input/output live — Click Edit on any tool-result card to tweak the input or output JSON and watch the widget re-render instantly; Run re-executes the tool with your edited input.
- Voice input — Click the mic button in the chat input to record your voice; the audio is transcribed and the text is inserted into the composer.
Getting Started
- Connect a server — Add and connect an MCP server from the Clients tab (or the + button in the chat input).
- Open the Playground — Switch to the Playground tab.
- Send a message or run a tool — Either chat with your server from the input bar and let the model call tools, or pick a tool from the left rail and execute it with your own input.
Layout
The Playground is a three-column IDE shell. Each side rail is collapsible — drag the divider or click the peek strip to hide or restore it. Left rail — Tools / Sessions- Tools (default) — Every tool exposed by your connected server(s). Pick one to fill in inputs and run it manually. When more than one server is selected, tools are aggregated across all of them and routed automatically on execution.
- Sessions — Browse, resume, rename, archive, and search past chat threads in the current project.
- Chat composer, conversation thread with inline tool calls and widgets, and the host context toolbar.
- Top of the pane has a segmented control to switch between Chat, Trace, and Raw views.
- Logs (always available) — Real-time feed of MCP protocol messages. Search, filter by source server, filter by log level, copy, download, or clear the buffer.
- Shell (shown when the previewed host has a Project Computer) — A live terminal on the computer the harness runs on. Click Open terminal to provision or wake the computer and connect. Switching between Logs and Shell keeps both the terminal WebSocket and the log stream alive so neither is dropped.
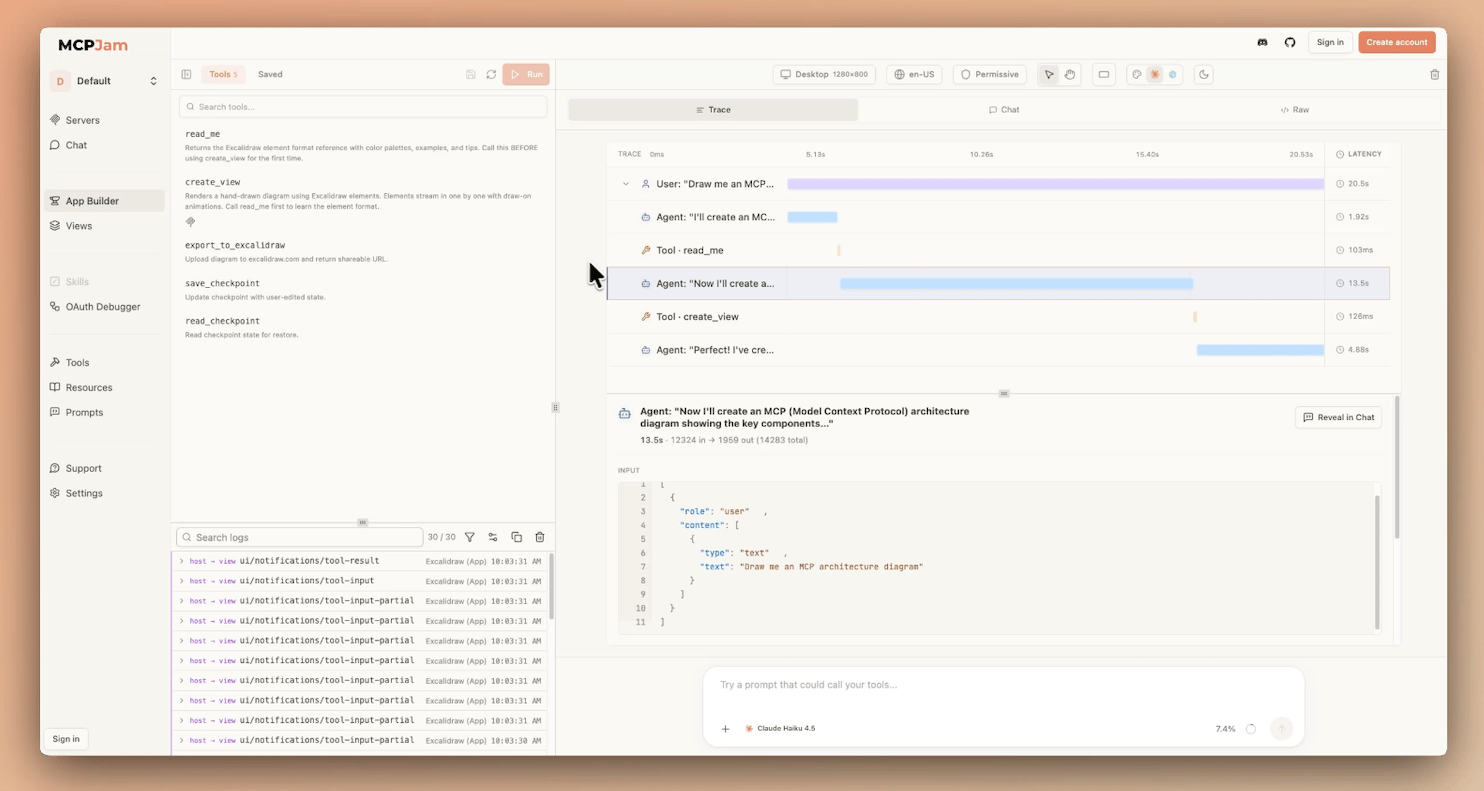
Chat, Trace, and Raw Views
Switch between three perspectives on the same conversation from the segmented control at the top of the center pane:- Chat — The normal thread with inline messages, tool calls, and rendered widgets.
- Trace — A timestamped timeline of every step (user turns, agent turns, tool calls) with per-step and total latency and token counts. Expand any step to inspect its raw input and output.
- Raw — The full JSON payload sent to the model (system prompt, tool definitions, conversation history). Available for both live sessions and previously-saved sessions you reopen.
Tools Rail (Manual Invocation)
Open the Tools tab in the left rail to invoke any tool by hand:- Select a tool to load its input form generated from the tool’s JSON Schema.
- Fill in fields, toggle optional fields on or off, and click Run to execute.
- The result appears in the center pane just like a model-issued tool call, with the same row of debugging icons and widget rendering.
- Click Refresh to re-fetch the tool list from the server (useful after a server reload).
- Click Save to persist the current inputs as a saved request you can rerun, rename, duplicate, or delete from the same panel.
Model Picker
The model picker in the chat input lets you choose which LLM to use. Models are organized into two tabs:- Free models — Frontier models (Claude, GPT, Gemini, DeepSeek, and more) available at no cost with no API key required.
- Your providers — Models from providers configured in your organization’s settings on mcpjam.com.
Out-of-credits state
When your MCPJam credit balance reaches zero, free models are grayed out in the picker with a tooltip explaining the limit. Models from your own providers remain enabled — switching to one is the fastest way to keep working. Paid top-up credits (if you have any) keep free models available even after your daily free allowance is exhausted. If the out-of-credits dialog appears, clicking Bring your own key closes the dialog and opens the model picker directly on the Your providers tab so you can switch to an own-key model without leaving the chat.Multi-Model Compare
Send one prompt to up to 3 models simultaneously. Open the model picker, toggle Multiple models on, and select the models you want to compare. Each model’s response — including tool calls and rendered widgets — appears in its own column.The Multiple models toggle is hidden when the active session is shared
with the project (project-visible). Enabling it on a shared session would
mutate experiment state for every collaborator. Switch the session back to
private to use multi-model compare.
Multi-Host Compare
Toggle Multiple hosts on in the host picker (top-left of the center header) to render the same tool calls under different host configurations side by side — for example, ChatGPT vs Claude host style, or desktop vs mobile viewports. One column is designated the lead host; chip tooltips in the toolbar say “Editing lead host: <name>” so it’s clear which column the host controls (theme, device, locale, etc.) currently bind to. Click another column’s chip to promote it to lead. This is the fastest way to verify that a widget renders correctly across the host environments you intend to ship to.The Multiple hosts toggle and the host picker are hidden when the active
session is shared with the project (project-visible), for the same reason as
multi-model compare. Switch the session back to private to use multi-host
compare.
Sessions
The Sessions tab in the left rail lists every saved conversation in the current project, grouped by recency. From here you can:- Open a session to resume it in the center pane.
- Rename, archive, or delete individual sessions.
- Archive all sessions at once.
- Search across session titles.
Host Context Toolbar
The toolbar above the chat thread controls how the active host renders your widgets. Every change applies to the next tool call and to already-rendered widgets where applicable.Device Viewports
- Desktop (1280×800)
- Tablet (820×1180)
- Mobile (430×932)
- Custom — Any width and height from 100 to 2560 pixels
Theme
Toggle light and dark mode to test both appearances.Host Style
Switch between Claude and ChatGPT host styles. For MCP Apps that use the MCP Apps style variables, the ChatGPT toggle translates the widget’s styles to ChatGPT’s design tokens. Each host style ships with a distincthostCapabilities preset. Switching from one preset to another changes the capabilities advertised in the ui/initialize handshake, so widgets that gate on optional fields (such as serverResources or logging) will behave differently under each style.
Copilot follows Microsoft 365 Copilot’s published bridge:
toolInfo is not delivered and pip is not advertised, so a widget that calls app.getHostContext()?.toolInfo on the Copilot preset correctly sees undefined.
Host Capabilities
The Host Capabilities button in the toolbar (next to Host Context) lets you override thehostCapabilities blob advertised to MCP App widgets in the ui/initialize response.
By default, the active host style’s preset is used. Click Host Capabilities to open the editor and customize which capabilities the mock host claims to support. This is useful for testing how your widget behaves when specific capabilities are absent or present — for example, verifying that your widget degrades gracefully when serverResources is not advertised.
- No override — the active host style’s preset is used (shown as the placeholder in the editor)
- Custom override — your JSON object is advertised verbatim; an “Override” badge appears on the button
- Clear override — resets back to the host style preset
Host Capabilities configures what the mock host advertises. Enforcement — rejecting widget requests for capabilities not in the blob — is a planned follow-up. Until then, the inspector will still service all widget requests regardless of what the handshake advertises.
Locale
Pick a BCP 47 locale (e.g.en-US, es-ES, ja-JP, fr-FR) to verify internationalization.
Timezone
Choose from 19 IANA timezones plusUTC to test time-aware widgets.
The timezone control is only available for MCP Apps (SEP-1865).
CSP Mode
- Permissive (default) — Allows all HTTP and HTTPS resources. Recommended for development.
- Strict — Only allows domains declared in your widget’s CSP metadata (
openai/widgetCSPor_meta.ui.cspfor ChatGPT Apps,ui.cspfor MCP Apps).
Device Capabilities
- Hover — Enable or disable hover support to test mouse vs touch-only behavior.
- Touch — Toggle touch input to simulate mobile and tablet devices.
Safe Area Insets
Simulate notches, rounded corners, and gesture areas. Pick a preset (None, iPhone with Notch, iPhone with Dynamic Island, Android gesture navigation) or set custom top/bottom/left/right values.Widget Controls
Download confirmation
When an MCP App widget triggers aui/download-file request, the inspector shows a confirmation dialog before the download runs. The dialog displays the filename, MIME type, and URI so you can make an informed decision. Click Download to allow it or Cancel to deny it — a denial is surfaced to the widget as a { isError: true } result so the widget can handle it gracefully.
Only one confirmation prompt is shown at a time. If a second download request arrives while a prompt is open, it is automatically denied.
Display Modes
All three display modes are supported for both ChatGPT Apps and MCP Apps:- Inline (default) — Widget renders within the chat message flow.
- Picture-in-Picture — Widget floats at the top of the screen, staying visible while scrolling.
- Fullscreen — Widget expands to fill the entire viewport.
Widget rendering
All widgets — whether they declareopenai/outputTemplate (ChatGPT Apps), _meta.ui.resourceUri (MCP Apps), or both — render through a single unified renderer. The window.openai compatibility shim is always injected, so both window.openai.* calls and ui/* JSON-RPC messages work regardless of which metadata the tool declares.
Widget rendering is gated on the active Client’s clientCapabilities. Hosts that advertise the MCP UI extension (Claude, ChatGPT, MCPJam, Copilot, Cursor) render widgets as normal. Hosts that strip the extension — such as Codex, an elicitation-only CLI — show the plain tool result row instead. Per-server capability overrides are honored.
Per-Widget Debugging
Every tool result in the chat thread has a row of icons in its header. Click an icon to open the matching debug panel below the widget.Sign-in links
When a computer-backed tool (such as Bash) runs a command that triggers a device-flow authentication prompt — for example,gh auth login — any sign-in URLs surfaced by the tool appear as clickable links directly in the chat thread under a Sign-in link heading. This saves you from hunting through scrollback for the URL. Only https: URLs are rendered as links; plain http: and non-web schemes are never shown.
Data
Raw tool input, output, and error details for the call.Widget State (ChatGPT Apps)
The currentwidgetState object and when it was last updated. This is what your widget sets via window.openai.setWidgetState and what gets passed back to the model on the next turn.
Model Context (MCP Apps)
The context your widget has sent back to the model viaui/update-model-context. Only appears when the widget has set model context.
CSP
In Strict mode, a badge shows the number of blocked requests. The panel includes:- Suggested fix — Copyable JSON snippet to add to your
openai/widgetCSPorui.cspfield. - Blocked requests — Each violation with the directive and source that was blocked.
- Declared domains — The connect, resource, frame, and base URI domains your widget currently declares.
Mounts
The debug panel includes a Mounts section that appears only when a widget iframe has been torn down and rebuilt more than once during a session. Each entry shows the mount index, the reason it fired, and a timestamp. A healthy widget has exactly one mount; multiple entries indicate an unexpected re-mount that may have wiped widget state.Edit input & output
Click Edit on a tool-result card to make the Input and Result JSON editable in place. Edits re-render the widget live with no reload; Run re-executes the tool with the edited input, and Revert restores the original. Edits are local to the session — nothing is persisted.Right Rail
The right rail has two tabs. The Logs tab is always present; the Shell tab appears when the previewed host has a Project Computer attached.Logs tab
Streams every message between the inspector and your connected server(s) in real time. Each entry shows the direction (client→server or server→client), the method name, and a timestamp. Click an entry to expand its full JSON payload. Logged messages include:- Tool invocation requests and responses
window.openaiAPI calls from your widget- Widget state updates
- MCP App JSON-RPC messages (
tools/call,ui/initialize,ui/message, etc.)
- Search the buffer
- Filter by source server
- Log level filter
- Copy the visible entries to your clipboard
- Download the buffer as a file
- Clear the buffer
- Collapse the rail
Shell tab
When the previewed host has a Project Computer, a Shell tab appears next to Logs. Click Open terminal to provision or wake the computer and open a live terminal session on the same machine the harness runs on. The computer status chip in the Shell header shows the current state (starting, ready, error, etc.). Both tabs stay mounted while you switch between them, so the terminal WebSocket and the log stream are never dropped.Input Bar
Click the + button on the left of the chat input to manage servers, attach files, and tune model behavior. Servers A list of every server in your project, sorted by status. Each row shows the server name and transport type (HTTP or stdio, npx/desktop only). Connect, disconnect, or toggle a server on or off for the current conversation. + Add server opens the add-server modal without leaving the Playground.
Attach files
Add files to the conversation in any of these ways:
- File picker — Click the + button and choose Attach files to browse and select files.
- Paste — Copy an image to your clipboard and paste it directly into the chat input (
Ctrl+V/Cmd+V). Pasted images without a filename are saved automatically aspasted-image-1.png,pasted-image-2.png, and so on. - Drag and drop — Drag one or more files from your desktop and drop them onto the chat input. A “Drop image or file to attach” overlay appears while you’re dragging to confirm the drop target.
Skills
The Playground respects every skill you’ve configured in the Skills tab. A skill ends up in a conversation in one of two ways:- Inferred — The model picks a skill based on your prompt, loads its instructions, and runs it against your MCP tools. Useful for observing skill behavior end-to-end.
- Explicit — Type
/in the input and pick a skill from the SKILLS section of the picker. The skill content is front-loaded before your message.
Prompts
Prompts are MCP prompt templates exposed by your servers viaprompts/list. Type / in the input and pick one from the PROMPTS section. Selected prompts appear as expandable cards above the input — source server ID, description, arguments (required ones marked with *), and a preview of the first message — so you can review or remove them before sending.
Workspace tools
When you are signed in as a project member, the Playground gives the model a set of built-in tools for interacting with the MCP servers saved in your project. These tools are not available to guests or in shared chatbox sessions.
Servers are identified by name or ID as saved in the project. Stdio servers are not supported for live operations — the model will receive a clear error rather than a connection failure.
When Tool Approval is on, the model pauses before
diagnose_server, call_server_tool, and read_server_resource (the operations that open a live connection) so you can approve or deny each one. Read-only listing tools (list_project_servers, list_server_tools, list_server_prompts, list_server_resources) never require approval.
These tools are only available when you are signed in as a project member. They are not shown to guests or in chatbox sessions.
Elicitation
When an MCP server needs additional input from you mid-tool-call, it can pause execution and ask a question. The Playground renders these requests as modal dialogs and resumes the tool call once you respond.Form elicitation
The server presents a form with fields defined by its schema. Fill in the fields and click Accept to submit your answer, or Decline to refuse. The tool call continues (or fails gracefully) based on your response.URL elicitation
The server asks you to visit a URL to complete an out-of-band step — for example, an OAuth authorization or a payment flow. The dialog shows:- The full destination URL as plain text (never as a clickable link, so you must read it before opening it).
- The host emphasized so subdomain spoofing is visible at a glance.
- Warnings for unsafe conditions: unencrypted
http://links, punycode hostnames that can mimic well-known domains, embedded credentials in the URL, and bare IP addresses.
http(s) schemes (such as javascript: or data:) are blocked outright and cannot be opened.
Click Open in new tab to open the URL. If your browser blocks the pop-up, a notice appears with a Copy link button so you can open it manually. The dialog only records your consent once the tab actually opens — a blocked pop-up does not count as acceptance.
Click Decline to refuse, or close the dialog to cancel without an explicit choice.
URL-required notices
If a tool call fails because the server requires you to complete an out-of-band interaction first (MCP error-32042), the Playground shows a URL-required notice. This is advisory — the tool call has already failed — so there is nothing to decline. Open the required URL(s), then retry the tool call or ask the model to try again.
When a server requires multiple interactions before a tool can run, the notice walks you through them one at a time and only dismisses once you have handled all of them.